
Codex APP 远程连接HPC指南
全文总结
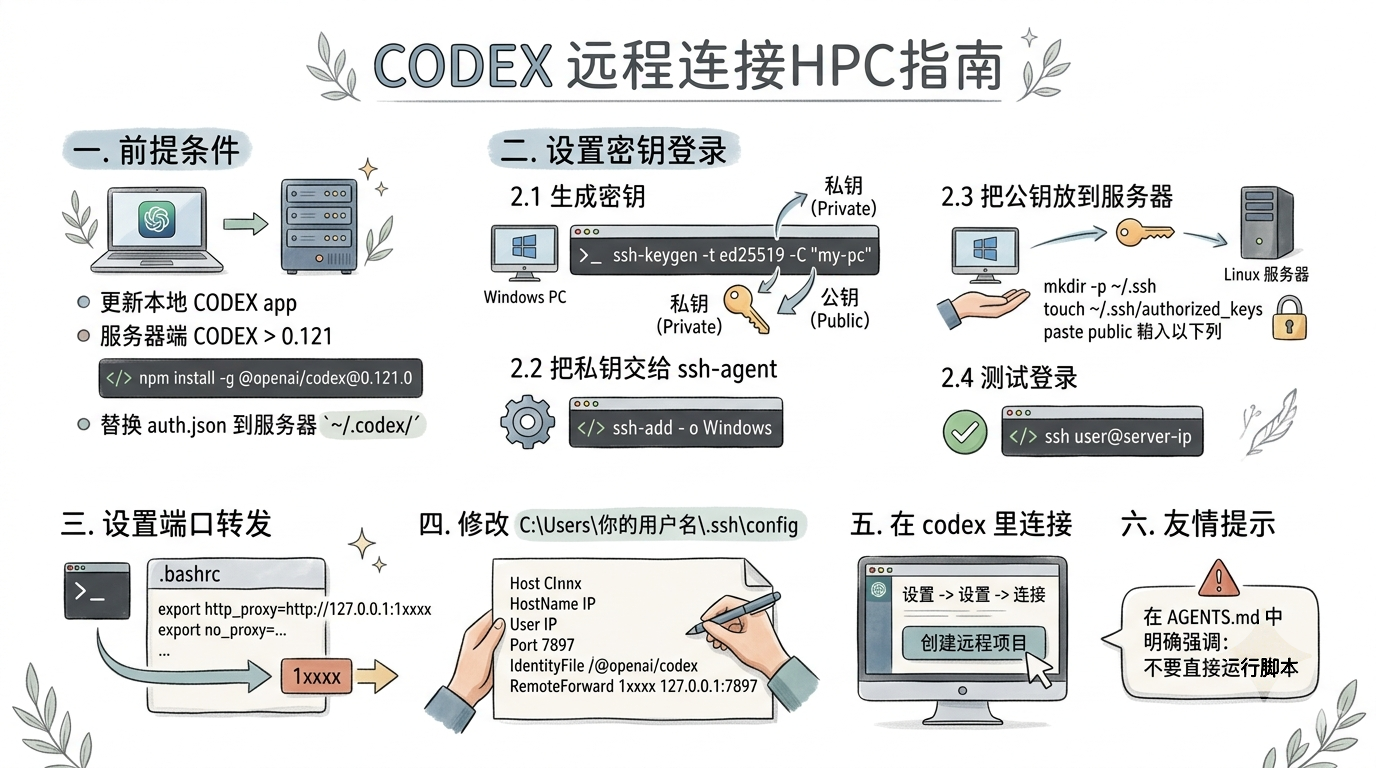
一.前提条件
本地的 codex app 更新到最新版(去微软商店更新)后,在本地的~/.codex/config.toml的[features]下写入remote_connections = true。服务器端的 codex 在 0.121 版本以上(npm install -g @openai/codex@0.121.0),用本地的 .codex/auth.json 替换到服务器端的 ~/.codex/auth.json,遇到报错去问 AI。
二.设置密钥登录
我这里直接用 Windows 作为客户端、Linux 服务器作为目标来讲,这是最常见的场景。如果你用的是 mac,步骤类似,按自己的系统环境调整即可。
2.1 生成密钥
如果你的 Windows 里没有 ssh 命令,先在系统“可选功能”里安装 OpenSSH Client。然后执行下面这条命令生成密钥:
ssh-keygen -t ed25519 -C "my-pc"一路回车即可。生成后一般会有这两个文件:
- 私钥:C:\Users\你的用户名\.ssh\id_ed25519
- 公钥:C:\Users\你的用户名\.ssh\id_ed25519.pub
2.2 把私钥交给 ssh-agent
Windows 的 ssh-agent 服务默认是禁用的。启用后,登录时就不用每次手动指定私钥。
Get-Service ssh-agent | Set-Service -StartupType Automatic
Start-Service ssh-agent
ssh-add $env:USERPROFILE\.ssh\id_ed25519
2.3 把公钥放到服务器
先在 Linux 服务器上执行:
mkdir -p ~/.ssh
chmod 700 ~/.ssh
touch ~/.ssh/authorized_keys
chmod 600 ~/.ssh/authorized_keys
再在 Windows 上查看公钥内容:
Get-Content $env:USERPROFILE\.ssh\id_ed25519.pub把输出的整行内容复制到服务器的 ~/.ssh/authorized_keys 里,一行一个公钥。
2.4 测试登录
ssh user@server-ip如果你不是默认文件名,就显式指定:
ssh -i $env:USERPROFILE\.ssh\id_ed25519 user@server-ip如果失败,可以加上 -v 查看详细认证过程:
ssh -v user@server-ip三.设置端口转发
服务器里打开 ~/.bashrc,加入:
export http_proxy=http://127.0.0.1:1xxxx
export https_proxy=http://127.0.0.1:1xxxx
export HTTP_PROXY="$http_proxy"
export HTTPS_PROXY="$https_proxy"
export no_proxy=localhost,127.0.0.1,::1
export NO_PROXY="$no_proxy"
这里的 1xxxx 可以替换成任意五位数字。http_proxy 和 https_proxy 保持一致即可;如果这台电脑还要给其他服务器配置同类端口转发,请使用不同的端口,避免冲突。
四.修改C:\Users\你的用户名\.ssh\config
codex 读取的是这个 config,在这里写好设置;如果本来没有,请先创建一个。
Host xxx
  HostName 10.1xx.2xx.1xx
  User xxx
  Port xxx22
  IdentityFile "C:\Users\你的用户名\.ssh\id_ed25519"
  IdentitiesOnly yes
  RemoteForward 1xxxx 127.0.0.1:7897
  ServerAliveCountMax 3
  TCPKeepAlive yes
  ExitOnForwardFailure yes
  Compression yes
  ConnectTimeout 30
  ControlMaster no
  ControlPath none
  ControlPersist no
Host 随便填。
HostName 填 IP。
User 和 Port 填用户名和端口。
IdentityFile 改成前一步生成的私钥存放位置。
RemoteForward 前面的 1xxxx 就是上一步设置的端口,后面的 7897 换成你梯子的端口,Clash Verge 默认是 7897。
五.在codex里连接
点击“设置 -> 设置 -> 连接”,手动开启连接,然后创建远程项目。接下来就可以开始用了。
六.友情提示
codex 运行有很大的自主性,一般会自动运行脚本。务必在 AGENTS.md 中明确强调不要直接运行脚本。
七.附:我在 HPC 上的 AGENTS.md
<extremely important>

- **Any command that executes user code, tests, binaries, or scripts must run through Slurm.**

- **Local shell use is allowed for lightweight actions such as reading, editing, or writing files, obtaining data file header information (e.g., ncdump -h, etc.), downloading and installing environments/packages (e.g., pip install, conda create/install, module load, etc.). Any testing, calculations, or other heavy-load tasks must go through srun or sbatch.**

- Forbidden outside Slurm: `python`, `pytest`, `python -m pytest`, `make test`, `ctest`, `npm test`, `uv run`, `poetry run`, and any other direct script/test/program execution.

- Before any execution, always inspect resources with:
  `sinfo -h -O Partition,Available,StateLong,CPUs,Memory,Gres,Time`

- Default to CPU. Use GPU only when the task uses CUDA/GPU (e.g., torch.cuda, TensorFlow GPU, JAX GPU, CUDA-dependent code).

- Allocate compute resources to optimize time-to-result while preserving reliability, efficiency, and fair cluster usage. Base the request on the workload’s demonstrated or expected CPU/GPU scalability, memory needs, I/O behavior, and queue/start-time tradeoffs. Do not under-request resources in a way that risks failure or excessive runtime, and do not over-request resources the job cannot efficiently use.
- If suitable compute nodes are idle or likely to start quickly, consider increasing the requested CPU, memory, node, or GPU resources to a reasonably high level that the workload is expected to use efficiently, so the task can complete faster without clearly wasteful over-allocation or undue impact on other users.

- Print the full Slurm command immediately before executing it.

- When writing and optimizing computational scripts, prioritize efficient algorithms and parallel computing tools suited to **HPC environments** such as **dask** and other parallel computing frameworks to improve **computational efficiency**, **resource utilization**, and **scalability**.

- Never fall back to local execution because Slurm is inconvenient.

- Use `srun` for small tasks: smoke tests, unit tests, quick validation, short debugging, single-command runs.

  Template:
  `srun -p <PARTITION> -n 1 -c <CPUS> --mem=<MEM> -t <TIME> <command>`

- Use `sbatch job.sh` for large tasks: expected runtime >15 minutes, multi-step pipelines, full benchmarks, training, data generation, or heavy full-suite tests.

  If queue/start-time matters, probe candidate configs first with:
  `srun --test-only ...`
  or
  `sbatch --test-only job.sh`

- `job.sh` template:

  ```bash
  #!/bin/bash
  #SBATCH --job-name=<JOB_NAME>
  #SBATCH --account=<ACCOUNT>
  #SBATCH --partition=<PARTITION>
  #SBATCH --nodes=1
  #SBATCH --ntasks-per-node=<NTASKS>
  #SBATCH --error=%j.err
  #SBATCH --time=<TIME>

  cd "$SLURM_SUBMIT_DIR"

  <run command>
  # e.g.
  # mpirun -np <NTASKS> ../bld/cesm.exe >& run.log
  ```

- Adjust `job.sh` to the actual workload. Do not leave placeholders in executed commands.

</extremely important>

## Slurm workflow

- First run:
  `sinfo -h -O Partition,Available,StateLong,CPUs,Memory,Gres,Time`
- Then classify the task:
  - Small task -> `srun`
  - Large task -> `sbatch`
- Treat a task as large if it is expected to run >15 minutes, needs multi-step orchestration, or requires heavy CPU/GPU/memory.
- Prefer CPU unless the workload requires GPU/CUDA.
- Use the most suitable allocation.
- If multiple configs are plausible and queue/start-time matters, test them with `--test-only` before real submission.
- Never execute the workload directly outside Slurm.